Hardwood Floor Medallion Installation Instructions
Tools and Materials Required:
- Router
- Routing
bit (one supplied)

- Template (supplied)
- A pencil, ruler
- Double-Sided Tape or finishing nails
- Flooring adhesive

- Dry Vac
- Quality Wood Filler ( check Woodwise line of fillers )
Estimated work time: 1 hour
Pre-requirements: Please read all the General requirements for wood floor parquet installation first. Ensure that all the conditions for the environment, subfloor, and materials are met before installing the medallion.
Note: Before installation, keep the medallion in the climate-controlled environment, flat, in a horizontal position. Keep the medallion in the original plastic wrap before installation.
The inlays are not meant to be stored for a long time. Even in perfect conditions, the unfinished medallion can absorb moisture from the air and expand, change geometry, or warp. We recommend installing the medallion within two weeks after receipt.
Humidity and Winter season warning: Please keep the humidity level in the house within an acceptable range of 36 to 60%. Dry in-house air is typical for a cold season. This is the primary cause for wood warping, gaps, and cracking in the inlays and is not covered by a warranty. Use either HVAC build-in or portable humidifier to maintain the environment. Inlays are more sensitive to moisture fluctuations than regular plank hardwood floors due to different wood species with different hygroscopic properties. A simple electronic Hygrometer can be purchased from Amazon for approximately $10-$20 to monitor the environment. Many smart thermostats show indoor Relative Humidity (RH).
General information
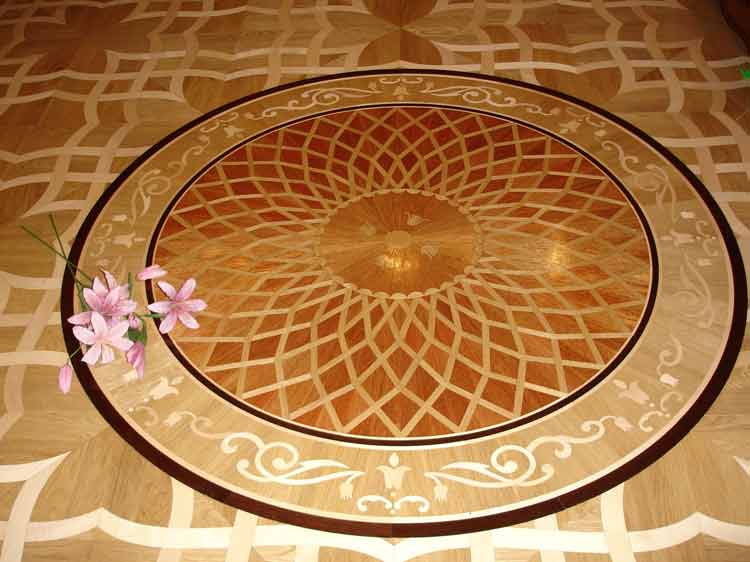
Wood floor medallions conceptually are installed by cutting the floor to the required shape and size, down to the subfloor. The medallion is glued-down into the opening. The floor can be new or existing, prefinished or unfinished.
Round, oval, odd-shaped medallions installed using a template. (Alternatively, round medallions can be installed using the jig method).
Rectangular medallions and the medallions with the straight lines are installed using the guide cutting method. Some installers prefer to glue the medallion with the square medallions first and then install the flooring around it.
Unfinished floor installation is preferred. The medallion and the floor are sanded and finished together on-site. This process offers a better fit for the inlay and the rest of the floor. Gaps can be patched with wood putty. Sanding of the entire floor ensures that the floor and inlays are at the same height and seamless transition.
The Prefinished floor installation requires the medallion to be already finished and the same thickness as the rest of the floor. Inlay installation can be done any other time after the floor is installed. However, it is less forgiving for the gaps and scratches during the installation.
Czar Floors hardwood medallions can be unfinished or prefinished. 3/4" thick medallions are constructed using 5/16" top wood, glued to the 7/16" hi-quality plywood backer.
Larger, over 70 in. medallions can be supplied in segments to be assembled on-site. Segments typically provided mesh net mounted on the back and face-taped to allow the installer to adjust segments fit on-site. Plywood backer is supplied separately. This is done to prevent warping and deformation in large inlays during transportation and storage.
Step #1
Choose the location where your medallion will be placed. On the subfloor, draw the lines to locate the center of the medallion. Have the customer approve the placement.
For the template method, line up the installation template, so the template lines align with the lines you have drawn on the subfloor. Then trace around the inside
of the template so that the shape of the medallion is drawn
on the subfloor. Remove the template and set it aside. Use a stud finder to find spots where the router may hit fasteners and mark those spots.
When you go over them with the router,
move slowly to grind off the top of the
fastener and then use a nail set to punch
the fastener down, out of the way.
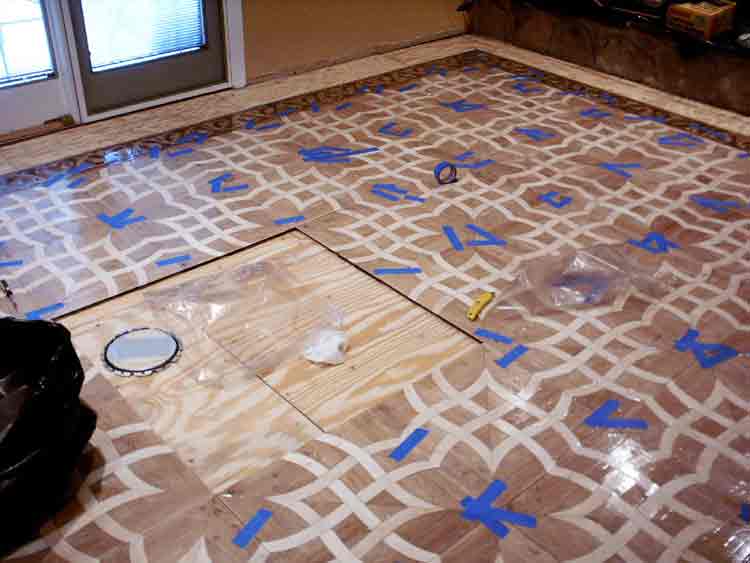
In the picture, the parquet tiles are not installed in the area where the medallion will be installed.
(Blue masking tape is used to hold the parquet tiles from moving during the glue curing period.)
Step #2
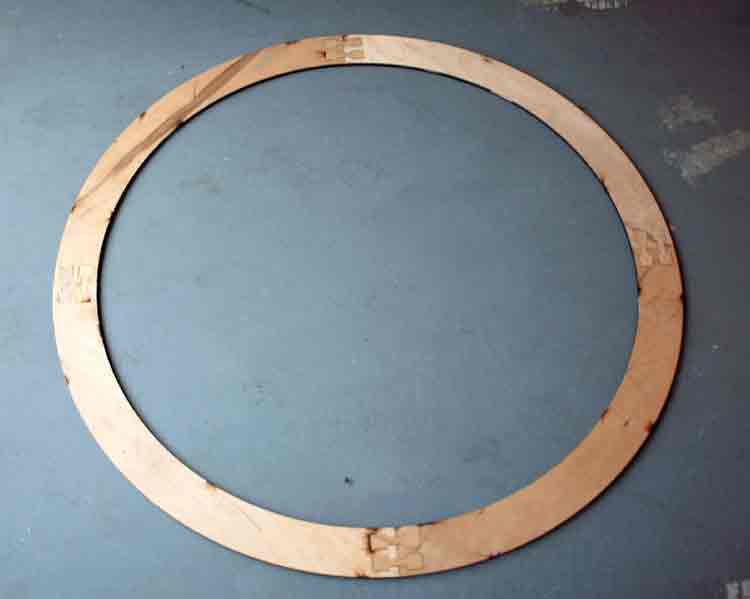
Assemble supplied plywood template. The template is assembled by connecting interlocking "keys" in each plywood segment. The inner circle is the same as the outside diameter of the medallion.
If installing in the prefinished or existing floor - skip to step 3.
Install flooring per manufacturer's instructions. Ensure the flooring
overlaps the medallion shape you traced on the floor by approximately
1/2 to 1". Assure none of the nails you use to install
the floor come too close to the area where the medallion is installed.
If the floor is unfinished, sand the floor in the medallion area
to assure the template will sit flush to the newly installed flooring.
Step #3
Line up the template back to the center lines you traced and fasten the template to the floor. (2 sided tape works well, or use small nails or staples).If nailing - try to place the nails between two boards, making the small holes easy to disguise. Make sure that the template covers the flooring you have installed.
Step #4
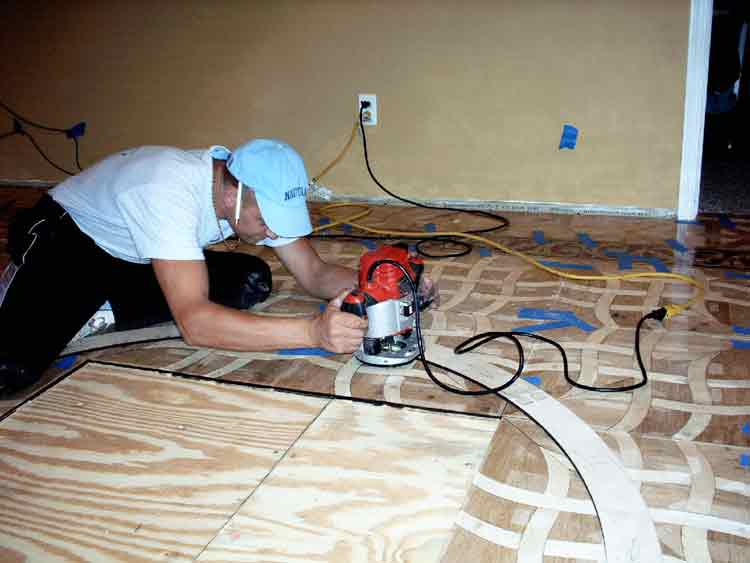
Equip your router with the bit and set the depth to route approximately 3/16" of the flooring at a pass. This will prevent overheating and failure of the routing bit.
Drop the flush cutter down, making sure that its bearing rides against the template edge.
Route around the inside of the template clockwise until you have routed flush to the subfloor. Vacuum between the passes thoroughly. Remove the router template.
Step #5
Vacuum and clean all the wood dust. Remove the moisture barrier, if any, and carefully check the subfloor for any protruding fasteners, setting any you can find.
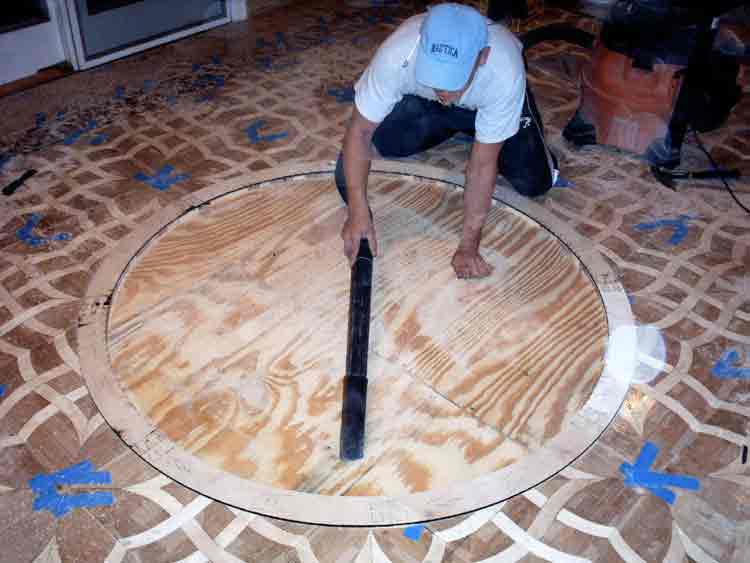
Also, check the subfloor for evenness, and use a hand-scraper to bring down any high spots
Medallions can be test fit into the hole you routed and be very close to flush with the rest of the floor*. (You may attach a piece of tape underneath the medallion so it'll be easier to pull it back). Some also apply clear packing tape to the medallion and use a suction cup to lift the medallion.
Apply flooring adhesive into the hole that you routed and spread evenly.
Place the medallion in the opening and weight with something that is heavy and distributes the weight evenly. Bags of sand or concrete work well. Let the glue cure per the manufacturer's instructions. (At least 24 hours). Wipe excessive glue immediately. As you set the medallion in, be careful that the points in the pattern align exactly where you want them.
* Note: Larger medallions could warp slightly before installation
if they have not been kept in a humidity-controlled environment or transit. If this is the case, you can use a circular saw to make relief cuts approximately 5/16" deep and spaced 2-3" apart on the medallion's backside. When the medallion is weighted, it should flatten out.
Step #6
If your floor and medallion are pre-finished, you are done!
If you are installing with an unfinished floor, the medallion can now be sanded and finished with the same method as the rest of your flooring. You should use good quality wood patches to mask all the gaps. There are patches that available in different wood species colors. For a good selection of wood fillers, please check Woodwise products. Some colors can be closely matched by the mixing of different patches. Fine wood dust left after floor cutting can also be used to fill the outer edge gap around the medallion. The use of patches is a routine procedure in medallion installation.
Care for our product the same as you usually would care
for a wood floor. Czar Floors recommends professional floor cleaning products such as Bona Pro ![]()
Optional. Cutting a round hole for the medallion using the jig method.
Round cut holes can be easily made using the router jig method, often sold as an accessory.
The jig can be made from a piece of 1/2" x 48" x 8" plywood. A router is installed on one end of the jig using original base screws.
Mark a line 2" inch from one end of the plywood. Preferably, using a forester bit if you have one, drill a 1/2" hole for the router bushing on this line in the center of the board width. ( use the router's removable baseplate as a template. The center hole need only be big enough for the size bit you use.)
Predrill hole on another end with the distance to the outer cutting edge of the bit equal to the required hole radius. Drive a nail or screw through the hole to fix it in the circle's center on the floor. Verify again to make sure that the size is set correctly.
Now you can turn on the router, lower the bit and rotate the jig you made around the pivot, cutting the circle. Cut the circle in several passes of 1/8" to 1/4" deep. For inside cutting, move the router clockwise.
Router bit can be any straight cut plunging type, preferably double flute.
Rockler Catalog is selling very convenient jig on-line.
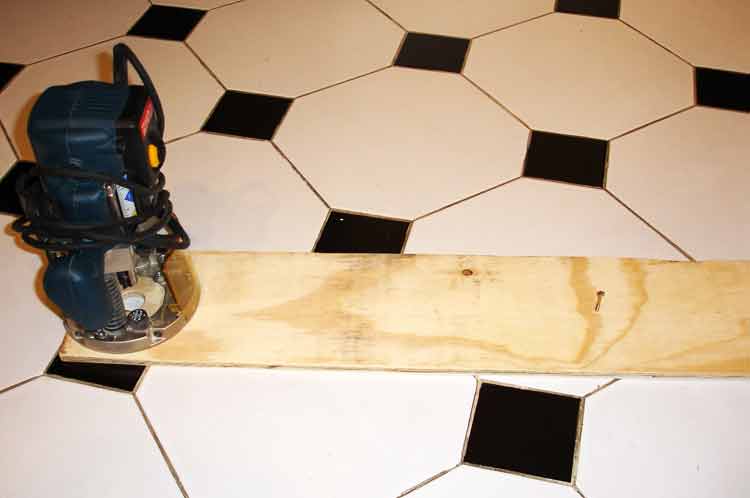
Guide method for cutting the floor for square medallions
- Outline the medallion shape on the floor.
- Attach a straight wood board along with one of the lines to the floor.
- Using the board as a guide, run the router along the board so that the routing bit cuts inside. Do it in few passes, about 3/16" at each pass until you cut to the subfloor. Run the bit so it would not cut beyond the ends of the line. The wood left in the corners would have to be chiseled afterward.
- Repeat for every straight line in the shape.
- Chisel all the corners to remove the leftover material and to archive a clean corner.
- Continue with step #5
General Guidelines, Tips, and Safety
- Always use your safety glasses, hearing, and dust protection.
- Read and understand the instructions for both the machinery and cutters before starting to work.
- Use safety devices such as pushblocks and featherboards where appropriate.
- When using the router, pay particular attention to the condition of the collet. Frequently, bit breakage and poor performance can be directly attributed to a worn or damaged router collet.
- Always inspect a router bit before use. Check for chips in the carbide, frozen bearings, worn shaft, and be sure set screws and nuts are tight in bit assemblies.
- Always change bits or make adjustments with the router unplugged.
- Make sure the bit shaft is set at least 3/4” into the collet but not bottomed out in the collet. The end of the shank should be about 1/16” up from the bottom of the collet.
- Two light passes cut more smoothly and efficiently than one heavy pass. Proper bit RPM is essential, especially with larger, heavier bits. In general, burning wood or excessive vibration can be corrected with a slower rpm and a lighter cutting pass.
- You may use a magnetic stud finder to locate the nails in the path of the router. Either drive nail down or slightly shifts the medallion position.
- If the medallion expanded and the template is no longer fits around the medallion, you can still use the template. Without connecting the last keys on the template, secure it to the floor, cut the circle except for the gap. Rotate the template to cover the gap and cut the remaining area.
- Failure to follow all safety instructions and warnings can result in serious bodily injury.
- In no event shall we be liable for death, injuries to persons, or property arising from the use of our products.