How to Install Parquet Floors
Installation instructions for Czar Floors parquet flooring
- Job Site Inspection
- Storage and Handling
- Subfloor Requirements
- Spreading the Adhesive
- Installing the Parquet Flooring
- Completing the Installation
- Sanding
- Stain and Finish
- Maintenance
- Installer/Owner Responsibility
PRE-INSTALLATION
Job Site Inspection
- The building should be closed in with all outside doors and windows in place. All concrete, masonry, framing members, drywall, paint, and other "wet" work should be thoroughly dry.
- The wall coverings should be in place, and the painting is completed except for the base molding's final coat. When possible, delay the installation of base molding until flooring installation is complete.
- Exterior grading should be complete with surface drainage directing water away from the building. All gutters and downspouts should be in place.
- Solid oak parquet may be installed on or above grade level only. Do not install in full bathrooms.
- Basements and crawl spaces must be dry and well ventilated.
- Crawl space must be a minimum of 24" (600 mm) from the ground to the underside of joists. A ground cover of 6-8 mil black polyethylene film is essential as a vapor barrier with joints lapped six inches and taped. The crawl space should have perimeter venting equal to a minimum of 1.5% of the crawl space square footage. These vents should be located appropriately to foster cross ventilation.
- Subfloor must be checked for moisture content using the appropriate testing method. Wooden subfloor moisture reading must not exceed 12%, and the differential between the flooring and subfloor must be less than 4%.
- Permanent air conditioning and heating systems should be in place and operational. The installation site should have a consistent room temperature of 65-75° F and humidity of 36-60% for 14 days prior, during, and until occupied to allow for proper acclimation.
Storage and Handling
Handle and unload with care. Store in a dry place to provide at least a four-inch air space under cartons stored upon "on-grade" concrete floors. Flooring should not be delivered until the building has been closed in with windows and doors in place until cement work, plastering, and all other "wet" work are completed and dry. The concrete should be at least 60 days old. Solid oak parquet flooring should be stored in the environment in which it is expected to perform. Air conditioning/heating systems should be in place and in operation at least 14 days prior, during, and after installing the flooring.
Unfinished parquet floors are not meant to be stored for prolong period. Even in perfect storage conditions, the unfinished wood can absorb moisture from the air and expand, change geometry. It is recommended to install the flooring within two weeks after receipt. Acclimation usually takes no more than a week.
Subfloor Preparation
If installing over an inadequate, existing plywood subfloor, consider installing plywood underlayment over the existing subfloor. Standard 4 X 8 plywood sheet should be cut into four pieces and screwed to the subfloor leaving a small, 1/8" gap between the sheets to expand.
Subfloor must be:
- CLEAN - Scrape, broom clean, and smooth. Free of wax, paint, oil, sealers, adhesives, curing agents, and other debris.
- LEVEL/FLAT - Within 3/16" in 10' and/or 1/8" in 6'. Sand high areas or joints, fill low areas (no more than 1/8" at a time) with a cementitious leveling compound or milk additive latex patch of 3,000 PSI minimum compressive strength. Follow the instructions of the leveling compound manufacturer. Leveling compounds must be tested for moisture to ensure they are properly cured and within the manufacturer's specified requirements for proper installation.
- STRUCTURALLY SOUND - Nail or screw any loose areas that squeak. Replace any water-damaged, swollen, or delaminated subflooring or underlayment. Avoid subfloor with excessive vertical movement unless they have been adequately stiffened before installing the wood flooring.
- DRY - Check the moisture content of the subfloor with a reliable moisture meter.
Recommended subfloor surfaces
- PREFERRED: 23/32" AdvanTech® flooring
- PREFERRED: 3/4" (19 mm) CDX grade plywood
- 3/4" (23/32") OSB PS2 rated underlayment
- MINIMUM: 5/8" CDX grade plywood
- Concrete slabs
- Ceramic, terrazzo, slate, and marble
- Acoustic concrete
- Cork (Acoustic)
- Vinyl, resilient tile, cork flooring
- Metal
- Existing solid wood flooring
- 3/4" chip, wafer board, particleboard
Concrete Slabs
Solid parquet flooring can be glued directly to concrete. If using Concrete sealer - it has to be from the same manufacturer as the adhesive. The concrete must be of high compressive strength. All concrete subfloors should be tested for moisture content. Visual checks are not reliable. Acceptable test methods for subfloor moisture content include:NOTE: Test several areas, especially near exterior walls and walls containing plumbing.
- Prepare a 3% Phenolphthalein in an Anhydrous alcohol solution. Chip the concrete at least 3/4" deep (do not apply directly to the concrete surface) and apply several drops of the solution to the chipped area. If any color change occurs, further testing is required.
- Calcium Chloride test. The maximum moisture transfer must not exceed 3 lbs./1000 square feet with this test.
- Tramex Concrete Moisture Encounter meter. Moisture readings should not exceed 4.5 on the upper scale.
Use CMP Level 1 Portland cement base leveling compound or equal. No gypsum products are accepted. Before applying leveling compound, examine the structural slab's surface for cracks and contaminants, grease, oil, and construction dust. When any of it is found, eliminate it.
NOTE: A "DRY" SLAB, AS DEFINED BY THESE TESTS, CAN BE WET AT OTHER TIMES OF THE YEAR. THESE TESTS DO NOT GUARANTEE A DRY SLAB. ALL CONCRETE SLABS SHOULD HAVE A MINIMUM OF 6 MIL POLY FILM MOISTURE BARRIER BETWEEN THE GROUND AND THE CONCRETE
Soundproof Subfloor Systems (when required)
- Over the corrected concrete slab, install RST10 10mm GenieMat sound attenuating recycled rubber underlayment sheets, as manufactured by Pliteq of Toronto, Canada, or equal.
- The rubber sheets to be installed in a full bed of Bostik Best or similar Polyurethane Adhesive, applied with trowels.
- However, the sheets to be installed without spacing between them allow ¾" expansion space at perimeters and all vertical terminations.
- Roll the GenieMat sheets with 100 lb. weight to ensure continuous adhesive transfer between the concrete slab and the mat. Allow the adhesive to dry for at least 24 hours.
- Over the GenieMat install ¾” X 2’ X 2’ square edge AdvanTech panels in staggered brick fashion, manufactured by Huber Engineered Wood, set in a full bed of the same adhesive, using trowels. Allow 1/8” expansion space between panels on all sides and ¾” at all vertical terminations. Roll panels with 100 lb weight to assure full transfer of adhesive between the GenieMat and underlayment panels.
- Allow at least 24 hours before commencement of finish floor installation.
Wood Subfloors
- Plywood: Must be APA grade rated sheathing or CDX minimum.
- Oriented Strand Board (OSB): Must be PS2 rated installed sealed side down.
- Particleboard: Must be a minimum 40-LB density, stamped underlayment grade, and 3/4" thick.
- Make sure the existing floor or subfloor is dry and well nailed or screwed down every 6" along each joist to avoid squeaking or popping before the floor is installed. The wood subfloor must not exceed 12% moisture content. Measure moisture content of both subfloor and wood flooring to determine proper moisture content with a reliable wood moisture meter. The difference between the wood subfloor's moisture content and the wood flooring must not exceed 4%. Optimum performance of hardwood floor covering products occurs when there is no horizontal or vertical movement of the subfloor.
- All underlayment panels should be spaced 1/8" - 1/4" apart to ensure adequate expansion space. This can be achieved by using a circular saw set at the underlayment depth and cutting around the panel's perimeter. Do not install over existing glue-down wood floors. Do not install over nailed floors that exceed 3-4" in width. Wide width floors must be overlaid with plywood. When installing over existing wood floors parallel with the flooring, it may be necessary to install an additional 1/4" layer of plywood to stabilize the flooring or install the wood floor at right angles.
Radiant Heated Floors
- The system must be operational and heated for at least seven days before beginning installation.
- Turn off heat and let the subfloor cool down to room temperature 3-4 hours before starting the job.
- Radiant heated floors must be temperature controlled or engineered for the R-rating of the floor covering product installed upon them. BEFORE installation begins, ascertain that the system is designed and controlled for wood flooring. Failure to do so may cause excessive heat damage and shrinkage. Install floor per the application instructions.
- Make sure you have at least 3/4" plywood subfloor on top of hydro pipes used for radiant heat. Preferably install two plywood layers: 1/2" in one direction and another 1/2" cross-grain direction. The floor should be installed again in a cross-grain direction to the plywood below.
- After installation, turn the system back on immediately to its normal room temperature setting. The subfloor surface must not exceed 85° F throughout the life of the floor.
- We recommended using Rift/Quartersawn material for radiant heat applications for the best results. It offers better dimensional stability. Learn more about Rift/Quartered sawn wood.
INSTALLATION
Spreading Adhesive
NOTE: Clean adhesive from the surface of the floor frequently using the recommended adhesive cleaner. Use a clean towel, frequently changed, to prevent haze and adhesive residue. Maximum Adhesive Working Times:
- Urethane Adhesive - 60 minutes (Always read container label before proceeding)
- Polymeric Resin Adhesive - 90 minutes (Always read container label before proceeding)
- All adhesives' open times and curing times vary depending upon subfloor porosity, air movement, humidity, and room temperature. Urethane adhesive has a shortened work time in high humidity environments, whereas polymeric resin adhesive working time will be lengthened. In areas of low humidity, the open time will be longer with urethanes and shorter with polymeric resins. Adjust the amount of adhesive spread accordingly. The adhesive should not be applied if subfloor or room temperature is below 65° F (20° C).
- Spread sufficient amounts of recommended adhesive with the recommended trowel (figure below) in an area that can be covered in 60-90 minutes.
-
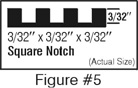
Trowel for glue application -
How to spread the adhesive for glue down installation of parquet
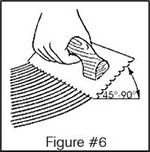
Hold the trowel at a minimum 45° angle (figure below) firmly against the subfloor to obtain a 50-60 sq. ft. per gallon spread rate.
- When not in use, keep the adhesive container tightly closed to prevent thickening. Thickening of the adhesive will cause difficulty in spreading the adhesive.
- Proper ventilation within the room must be provided. An electric fan is helpful.
NOTE: When installing UNFINISHED SOLID WOOD PARQUET flooring, allow a minimum of 36 hours adhesive curing time before applying seals, stains, and finishes to unfinished flooring. Trowel filling and fillers are required to reduce the possibility of panelization caused by the finish "gluing" the slats together. Test the moisture content of the wood per the stain/finish manufacturer's recommendations. Avoid installing from the surface of the flooring. If necessary, distribute weight using a kneeler board.
Please follow the technical specification for working time for adhesive.
Czar Floors recommends Bostik's Best or Sika SikaBond adhesive for most applications.
For installation over concrete, radiant heated floors, soundproofing, we recommend using Bostik Ultra-Set SingleStep 2 . It combines hardwood adhesive with moisture vapor barrier and sound reduction membrane.
Listed adhesives are the only adhesives tested and certified by Czar Floors. Use other adhesives at your own risk. Czar Floors does not provide a warranty on subfloor separation for other adhesives. Those adhesives are available at the specialized flooring distributors or can be purchased through Czar Floors.
Installing parquet modules
- It may help to dry lay the section of the floor first to get an idea. This is especially helpful with artistic parquet. Use drawings as your reference.
- Immediately lay the floor tiles on the newly spread adhesive. DO NOT lay the floor tiles on the dry adhesive (Always lay the floor tiles on wet adhesive). If the adhesive becomes too dry, scrape up the old adhesive and spread more. Installing on wet adhesive eliminates rolling the floor with a heavy roller. The working time for the adhesive is 60-90 minutes. Working time will vary depending on the job site conditions. IMPORTANT: Stand or kneel on the subfloor during the installation to avoid shifting the tiles. TIP: Slightly slide tile diagonally about 1" back and forth to ensure good adhesive spread. Tile can be temporarily secured with finishing nails.
- PROPER PLACEMENT OF THE FIRST FLOOR TILE IS THE KEY TO THE ENTIRE INSTALLATION. Carefully place a parquet tile at the intersection of the two chalk lines. Use spare boards to align and secure the tiles, as shown in the picture below. Start at the center of the room in one of the quadrants using chalk lines and temporary boards as a guide.
- Continue laying the balance of the floor tiles along the starting quadrant. Align each floor tile squarely.
- Do not push or shove the floor tiles too strenuously, as this could cause the other tiles to move. Realign them and proceed with the installation. Use pieces of wide blue masking tape to temporarily hold the tiles to avoid "floating" of the tile in wet adhesive. This tape can be removed after the glue is cured or sanded off. Alternatively, you can secure the parquet module with two-three staples (not nails) shot at the side of the tile.
- Avoid hammering or forcing the floor tiles together as this will destroy the built-in expansion spaces and may destroy the squareness of the floor tile. You may use a rubber mallet to tap the tiles.
- After laying the floor tiles across the first starting area, trim the last floor tiles as needed to obtain the proper 1/2" expansion space next to the walls. Use a small band or saber saw for final trimming. Firmly secure each floor tile when cutting with a saber saw.
- During the installation, occasionally remove a flooring piece from the subfloor and inspect the back for proper adhesive transfer. An adequate adhesive transfer is necessary to ensure sufficient holding strength. DO NOT REMOVE PROTECTIVE PLASTIC TAPE ON THE TILE SURFACE. The tape will be removed during first-pass sanding.
Diagonal Parquet Tile Installation
A diagonal pattern is recommended in corridors and in rooms where the length is more than one and half times the width. This diagonal placement minimizes expansion under high humidity conditions but does not change the requirements for expansion at the wall lines. It takes a bit longer to fit trim but gives your customer diamonds instead of squares and is worthy of a labor up-charge.
- Mark on the subfloor along the longer walls at the middle point of the room. Snap a chalk line between these two points to establish a primary line.
- Mark on the subfloor along the shorter wall at the middle point of the room. Snap a chalk line between these two points at the center of the room to establish the secondary or perpendicular line. Adjust secondary line using the 3-4-5 Pythagorean Theorem. The two lines you have just drawn are the most important. All other lines will be measured from these lines.
- To establish two 45º lines, measure a 1/2 from the center of the room along the longest wall and place a mark on each line in both directions. Use trammel points or a beam compass to make this step easy and accurate. Using the same measurement, draw an arc from each of the points established in Step 3 on the subfloor where 45º line will cross, showing four bisected arcs. Snap chalk lines between these points. These new lines should go directly through the center of the room. The first four parquets should be meeting at the dead center of the room.
- Install using a pyramid or stair-step pattern. Wood parquet “squares” are not always square. They are not “die-cut” or stamped out. They are cut on saws, and the wood is affected by moisture changes. Therefore, they will not be perfect and must be installed in the pyramid pattern — not row by row.
- Place the parquet unit carefully at the intersection of your two lines. Lay the next units ahead and to the right of the one along the lines. Then continue the stair-step sequence, observing the corner alignment of new units with those already in place. As it is placed, each unit should be adjusted to keep the corners true or "on point" and, if necessary, give up a tight fit along the sides. Install in a quadrant of the room, leaving trimming at the walls until later. Then return to the base lines and lay another quadrant, repeating the stair-step sequence. Install the last quadrant from the base line to the door. A reducer strip may be required at the doorway if transitioning to another floor. To lay row-by-row and tight guarantees that the variations continue to compound themselves and produce disaster after five or six rows.
- Build the field by maintaining the pyramid and enlarging it, with constant reference to the working lines. Be sure to “seat” each unit in the adhesive. Adjust the units as you go and stay within the limits of the adhesive.


For medallion installation instructions, please follow this link: Medallion Installation Instructions
If installing flooring medallion, install parquet tiles without glue in this area. The medallion shape can be outlined first on the subfloor and then marked on the parquet using the template.
Completing Installation
- When the starting area has been completed, including cutting to the wall, proceed to the second laying area.
- The second laying area is quite simple as you now have sufficient floor tiles installed to resist floor tile movement.
- Again, cut the last floor tiles to allow a 1/2" expansion space from the end wall.
- Proceed by laying other areas, repeating the installation procedure of the starting area. Trim out each laying area before proceeding to the next area.
- Maintain the 1/2" expansion space around the perimeter of the room and all fixed objects.
- Avoid pressing heavily or stepping on the recently laid floor tile as this may destroy the ridging of the adhesive and positioning of the tile.
- It is normal to have some gaps between tiles and wood pieces after this phase. Use quality wood patches and Full-Trowel Fillers to cover those gaps. Full-Trowel Filler is thinner than Wood Patch and designed to spread across the wood floor's surface. Just pour a workable puddle and trowel the floor, going back and forth across the cracks and voids to ensure deep penetration, removing excess filler as you go. Three 1/2-gallon pail fills up to 3,000 square feet. Bona makes an excellent line of wood fillers.
- Allow a minimum of 36 hours drying time before moving furniture or walking on the newly laid parquet floor.
Sanding of wood parquet
When sanding a hardwood floor where grain pattern differ such as parquet or inlay cut at a 45-degree angle to the floor in two directions. Third cut along the room's longest side. Possibly a fourth pass, using a floor polisher and hard plate. Extra hand-sanding work may be required.
Use a drum sander to remove
the transparent plastic tape from the surface of the face-taped parquet. Start with 36-grit belt paper. It will aggressively remove the tape and flatten the surface.
The belt may still gum up at some point, and you must change it.
It is essential to use a robust, well-tuned belt sander, such as Hummel by Lägler.
Three sandings with progressively finer paper are recommended. Pay attention if several different kinds of wood used in the parquet as softer woods may sand faster than harder species and may develop uneven surface. Small areas with medallions or borders are better sanded with the floor polisher and sandpaper on a hard plate.
When using mixed media such as stone and parquet, consider using plywood blanks inserted in the place of marble or stone during the sanding phase.
For in-depth instructions, read the excellent Floor Sanding manual by Lägler - leading floor sander manufacturer.
Stain and Finish
Stains are not recommended for the parquet that used various wood species. Many species accept stain differently. Clearcoat Polyurethane or wax finish can be applied.
One-Two coats of fast-drying sealer can be applied. To enhance the appearance and deepen the color of the wooden floors, consider using
Bona Prime Amberseal
sealer.
![]() Always use a sealer and finish from the same manufacturer.
Always use a sealer and finish from the same manufacturer.
You can use pretty much any Water-based, Oil-based, or Hard Wax floor finishes with our flooring.
Czar Floors recommends finishes made by Bona, such as
Traffic HD
![]() or
Street Shoe NXT
by Basic Coatings.
or
Street Shoe NXT
by Basic Coatings.
Parquet Floor Maintenance
Vacuum your floor as often as you would your carpet. Don't use rotating brushes - turn it off if possible. If the hard wax is used for the finish, periodically buff the floor using paste wax.
It is essential to maintain the relative humidity level in the 36 to 60% range. Use portable or HVAC built-in humidifiers during the heating season.
Use cleaning products specifically formulated for the hardwood floors, such as Bona Pro
![]()
Download Czar Floors Parquet Care Note
Download NWFA Floor Maintenance Guide
For general hardwood floor questions, please check the excellent NWFA (National Wood Flooring Association) website. Czar Floors is a proud member of this organization.
Installer/Owner Responsibility
Beautiful hardwood floors are a product of nature and, therefore, not perfect. Our wood floors are manufactured in accordance with accepted industry standards, which permit a defect tolerance not to exceed 5%. The defects may be of a manufacturing or natural type.
- The installer assumes all responsibility for the final inspection of product quality. This inspection of all flooring should be done before installation. Carefully examine the flooring for color, finish, and quality before installing it. If the material is not acceptable, do not install it and contact us immediately.
- Before installing any hardwood-flooring product, the installer must determine that the job-site environment and the sub-surfaces involved meet or exceed all applicable standards and recommendations of the construction and materials industries. These instructions recommend that the construction and subfloor be dry, stiff, and flat. The manufacturer declines any responsibility for job failure resulting from or associated with sub-surface or job-site environment deficiencies.
- Before installation, the installer/owner has final inspection responsibility for grade, manufacture, and factory finish. The installer must use reasonable selectivity and hold out or cut off pieces with defects, whatever the cause.
- Use of stain, filler, or putty stick for defect correction during installation should be accepted as standard procedure.
- When the flooring is ordered, at least 10% must be added to the actual square footage needed for cutting and grading allowance.
- Should an individual piece be doubtful as to grade, manufacture, or factory finish, the installer should not use the piece.
- The use of appropriate products for correcting subfloor voids should be accepted as a standard industry practice.
